The Ultimate Guide to Searing Sous Vide Food
Why is searing important?
Sous Vide cooking isn’t one step process. To do it right requires a careful attention to detail and a variety of techniques. One of the most important things to get right is the sear. Whether you’re cooking a steak, chicken breast, or a full rack of ribs, obtaining a crispy sear is crucial. Traditionally, these cuts of meat were cooked on a pan, in an oven, or on a grill, so that sought-after crisp was obtained every time. Sous vide, however, leaves your perfectly cooked meat without a crisp crust. Unfortunately, while your cut of meat might be exquisitely cooked within a sous vide bag, it won’t be satisfying to most people without adding the crisp of a nice sear. Because of this, properly searing your sous vide food is absolutely necessary. The cooking process simply isn’t complete without it. Luckily, there are a whole slew of ways we can achieve this, and I’m going to lay out the steps to obtain the perfect sear for sous vide.
To pre-sear or not to pre-sear?
Pre-searing can help you get an extra thick crust without doing too much of it at once and potentially overcooking the center, defeating the purpose of sous vide. However, I personally feel this is an unnecessary step since it IS possible to get a perfect crust by only searing at the end. This isn’t easy to accomplish, but it is preferable. Also, another point to note: never pre-sear as a replacement of post-searing; only pre-sear in addition to post-searing. A post-sear is a necessary part of the sous vide cooking process, while pre-sear is purely optional.
Methods and Equipment for Searing Sous Vide Food
There are plenty of different ways to sear sous vide steaks, roasts, and virtually any cut of meat. Of course, some methods are better than others. Determining which method works the best can be a tough and timely process. We decided to take that time-consuming and frustrating process of experimentation out of your sous vide experience. To make things easier, we ranked have ranked all of the searing processes in order from best to worst. Now, you’ll know the ideal way to add that little finishing touch of a sear to your finest sous vide meats.
Pan Sear – Best
Pan searing is hands down the best method for searing sous vide food, especially steaks. If your food can fit in a pan, it’s usually the best option. Pans can be preheated to crazy high temperatures for that hot-and-fast sear that will get a nice crust on the outside before the meat has sat on the heat long enough to cook through the middle. The downside? It can often be grounds for divorce and family hardship from constantly setting off all of the smoke alarms. Luckily, my step by step guide below will help save your marriage. There is a way to do this safely and without filling your kitchen with smoke. Keep reading and you’ll find out how.
Cast Iron Pan
Simply put, cast iron pans are a staple of the culinary world and a product every sous-vider should own. Cast iron holds temperatures extremely well – once its hot, it stays hot for a long time. They will also outlive all of us due to their durability (queue existential crisis) and can be purchased for, like, 20 bucks. You won’t get better value than that when searching out a pan. Most of us probably already own one of these, so you’re good to go and this will get the job done.
Carbon Steel Pan
If you don’t already own a cast iron, and want to try something a bit different and equally as good as cast iron, take a look at carbon steel. Serious Eats highlighted carbon steel pans which retain heat equally as well but also have a few different characteristics including:
- Sloped walls allow for flipping food. Cast iron are usually vertical.
- A bit lighter in weight.
So, it’s an effective cast iron alternative, if that style of pan isn’t really an option for you.
Stainless steel Pan
Finally, we have stainless steel pans. I rarely use this to sear sous vide food, because the two above options are better. However, stainless steel is definitely a better choice for acidic foods since cast iron and carbon steel are reactive metals and cannot cook acidic foods for extended periods of time. If you’re searing any sous vide meat, go with cast iron or carbon pans. They are easily the best options out there.
Sous Vide Sear Torch
Whenever friends or relatives see me break out a torch for cooking, they think I’m crazy. Fair enough. It’s pretty dramatic to break out a torch in the kitchen and start flailing that fire around. However, cooking torches aren’t just about adding drama and excitement to a kitchen session. They also serve such an amazing purpose, especially in the sous vide world. I honestly think every at-home sous vide chef should own a searing torch if they want to take their sous vide cooking to the next level (especially in regards to obtaining the perfect sear). You can use a torch to sear sous vide food by itself, but that often takes quite a while and can end up changing the flavors of the food after a while. The best way to use a torch is in addition to pan searing. Break out that torch as soon as you lay your steak in a pan of hot oil and start searing the top end of the steak while the bottom is on the pan, then flip it over and repeat. Here are some pros and cons regarding why the torch is a such a fantastic addition to any sous vide session.
| Pros | Cons |
| Won’t overcook the center at all. | Takes long to get a good sear by only using the torch |
| Can be used in addition to other searing methods or as a standalone method. | Some torches can affect the taste (butane-type-of-flavors), but most searing models do not. |
While we’re on the topic of sous vide torches, let’s take a look at two of the most popular, and our favorite, types available on the market. Not all torches are created equal. These are the ones that you’ll want to seek out to maximize your sous vide skills.
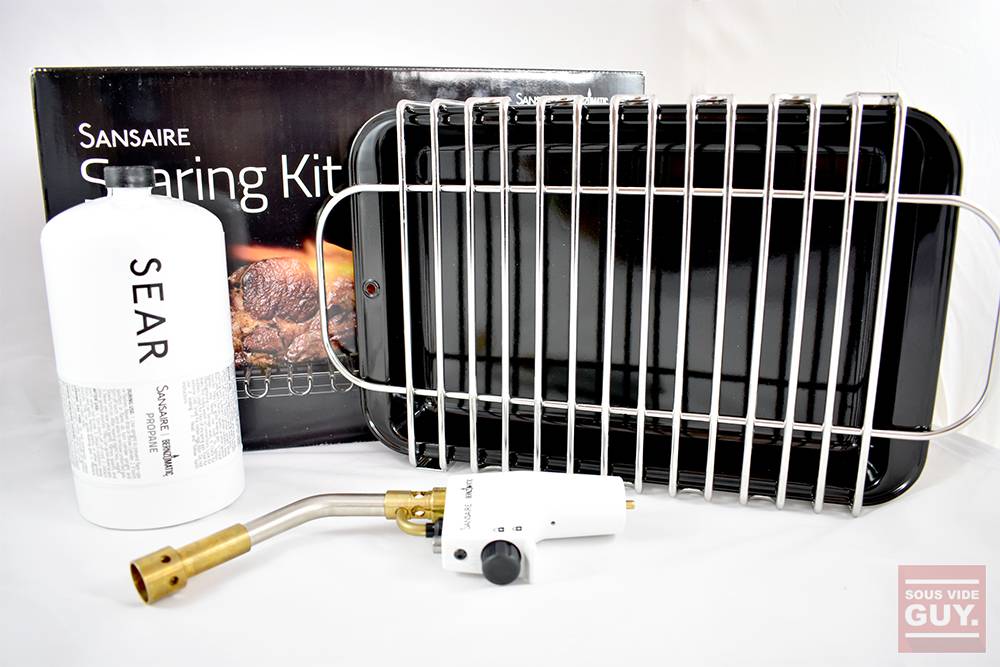
Sansaire Searing Kit
Sansaire, one of the big players in the sous vide industry and maker of the Sansaire immersion circulator (check out our review here), also sells an impressive sous vide searing kit. We had the opportunity to test out the Sansaire searing kit, which comes with an intense 2,200 degree F searing torch, a searing rack, and a drip tray. The flame on this thing is BIG and is amazing at searing roasts and big cuts of meat with odd shapes that are hard to fully sear in pans. The flame on this thing is bigger than any other kitchen torch I’ve seen. It’s worth it just to see and use that big, beautiful flame.
Searzall
You may have heard the name before, but chalked it up as the name of one of Daenerys’ dragons. Despite popular belief, the Searzall is actually an add-on torch accessory and not even remotely dragon-related. Instead of using a thin flame to sear a cut of meat, which could take quite some time, the Searzall uses the same intense heat from the torch flame but speeds up the process by distributing the temperature. Searzall is especially beneficial if you plan on using torch-only to obtain a sear because it has the wider spread heat and also reduces the potential “gas taste” that can often spoil a torched meal.

Summary: The Sansaire torch is more precise to sear the nooks and crannies of your meat – the pieces that are missed from pan searing. It works amazing as a supplement to pan sears, and is our recommended method.
Oven
You can obtain a sear with your oven by simply preheating it to, say 300 degrees, or by using your broiler. Often times the broiler is better for a quick sear to smaller cuts while using the actual oven can help obtain a rich bark on larger roasts. Similar to grilling, using your oven to sear sous vide food is mainly beneficial for larger cuts of meat, such as roasts, which may be hard to sear in a pan or too time consuming for a blow torch. We’ve had great success using our oven to crisp up our round roasts, pork shoulders, and ribs.
| Pros | Cons |
| Next best indoor method behind pan searing for larger cuts (roasts) | Less direct surface contact |
| Incredibly easy | Easier to overcook internal temps |
Grilling
Grills are traditionally great at getting that thick dark crust we know and love; however, this is obtained from prolonged direct contact to the flames below it. And since the trick to the perfect sous vide sear is cooking your meat hot and fast, gas grilling is far from the perfect method. However, we did place this above smoking because charcoal grills CAN get hot enough for a quick sear. Nonetheless, there are good and bad aspects of using a grill for searing sous vide meats, so let’s take a look at the pros and cons.
| Pros | Cons |
| Easy to sear larger cuts, such as a rack of ribs | Less direct surface contact |
| Easier to sear in bulk (ie. cooking for a lot of people) | More difficult to reach high heat, especially with gas grills |
| Potentially nice weather! | Potentially bad weather… |
Smoking
Smoking can get an amazingly rich crust, and is particularly good on sous vide smoked briskets which Serious Eats detailed in their thorough guide. Since smoking uses a “low and slow” method, it’s important to make sure you either A) immediately place your food into an ice bath after the sous vide cook and before the smoker in order to lower the internal temperature or B) refrigerate it overnight and finish the cook in a smoker the next day. The reason for this is that the smoker will raise the overall temperature of the meat and overcook it, ruining the whole point of sous vide. Long story short, if you plan on using a smoker to develop your sear, make sure to not overcook it!
| Pros | Cons |
| Easy to get a crust on larger cuts | Low and slow heat |
| You get the delicious smokiness | Requires chilling of meat beforehand to prevent overcooking |
Deep fry
While technically not a sear, deep frying is another method to attain crispiness for sous vide meats; however, we personally do not use this very often. It’s just a very different cooking experience and often cheapens the quality of a sous vide meat. We much prefer getting a dark crust from the above methods first. The Bearded Griller tests out deep drying his sous vide steak in this video.
Step by Step Guide for the Perfect Sear
Pan Sear + Torch = Best Sear
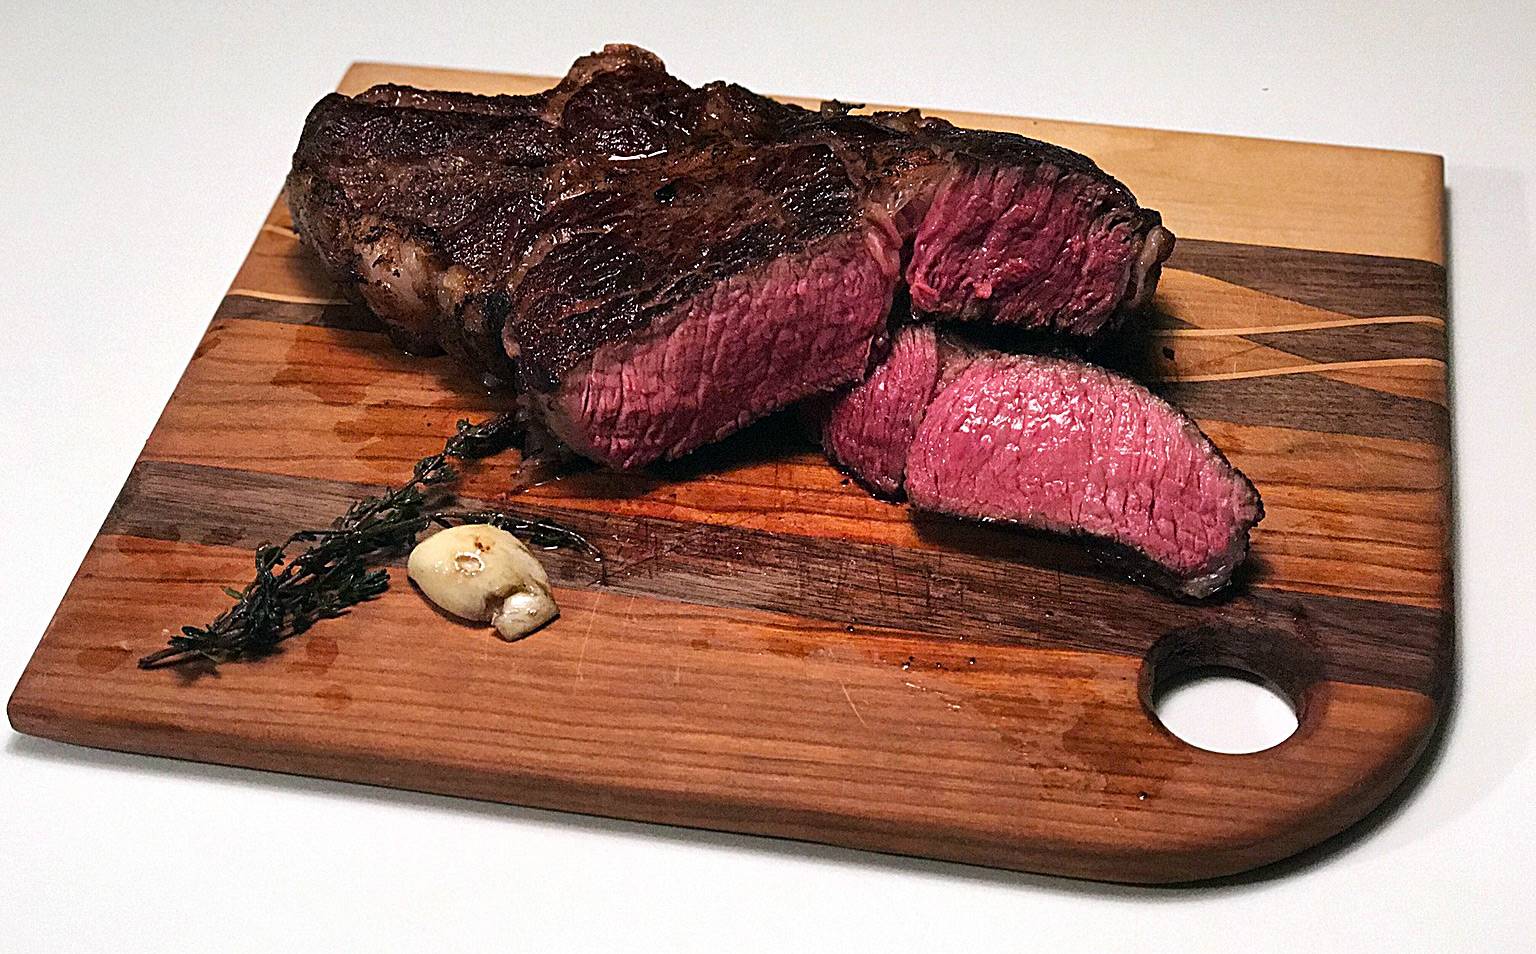
After a great deal of extensive testing, I’ve concluded that the combination of pan searing and torching results in the best sear. The alternative methods don’t even come close. When many people purchase their torches, they rely way too much on it and some even skip the pan entirely. I DO NOT recommend using a torch only. This gives an off-flavored combination of burnt steak and maybe even gas (depending on your torch model). Torches do not get a deep enough of a crust to be a proper sear for steaks. But they are perfect for searing the areas of the steak that the pan did not touch, and for further developing the crust from the pan (think of it as a torch finish to a traditional pan sear). Doing this successfully will result in a mouth-watering appearance and unbelievable outside crisp.
I also mentioned above that my method involves much more than simply getting a good sear – it saves marriages. If you’re anything like me, my wife used to sigh when she saw me break out one of my sous vide machines because she knew that meant smoke alarms going off later on. My stove vent is not nearly powerful enough to handle the smoke that equates from following most searing guides (which is to get avocado or peanut oil to its smoking point before even starting). So I set out to find a sear that works without filling the house with smoke. It’s an ideal way to get a base pan sear before the smoke gets too intense, and then finish off those missing sear spots with a torch.
So, how do I do I get a perfectly prepared piece of sous vide to have this delicious sear? Read on for detailed instructions.
Step 1: Heat Cast Iron Pan on MEDIUM HIGH
I know what you’re thinking, “What is this guy crazy?! How can I sear a steak on medium?!” Calm down. It actually works quite well. Cast iron pans take a bit to really heat up, so add your avocado oil (or another high smoke point oil) to the pan and let it heat up for a few minutes. Use a digital infrared thermometer to check the surface temperature of your pan. Anything about 350 or above will sizzle. I aim for 450 degrees and had my burner between 6 and 7 out of 9. One of the main reasons people smoke their houses out is because they crank the pan on high heat, and then once the smoke starts billowing they turn the heat down. But the issue is, cast iron pans hold heat so well, that turning down your heat will take quite some time to feel the affect. So the key is to not even let that happen. Slow and low is the way to go!
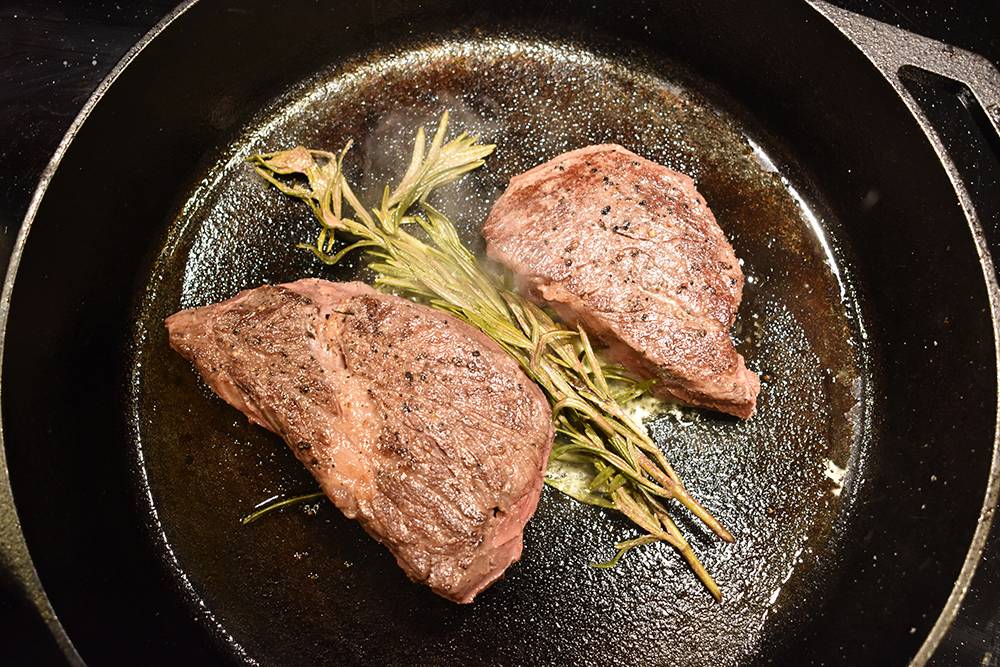
Step 2: Add Steak, Flip Often
Dry your steak very well by patting it with paper towels. Get out all of that excess moisture. If you don’t believe your infrared thermometer, test it out first by putting a corner of the steak down. If it’s not sizzling (or starts smoking too much), adjust the temperature accordingly and wait. If its ready, add your steak and flip often. I flip about every 15 seconds or so making sure to also get the sides and edges. I do this for about 1 minute.
Step 3: Add Butter to Pan
I think this step really helps to develop a crust. After you do the initial sear for about a minute, add butter to the pan and continue searing for an additional minute, flipping regularly throughout this process. You have to be the judge at this point, since The crust won’t be staggering, but it should at least be a good, solid deep brown. Just don’t expect it to have a fresh-off-the-grill thick crust through this particular method.
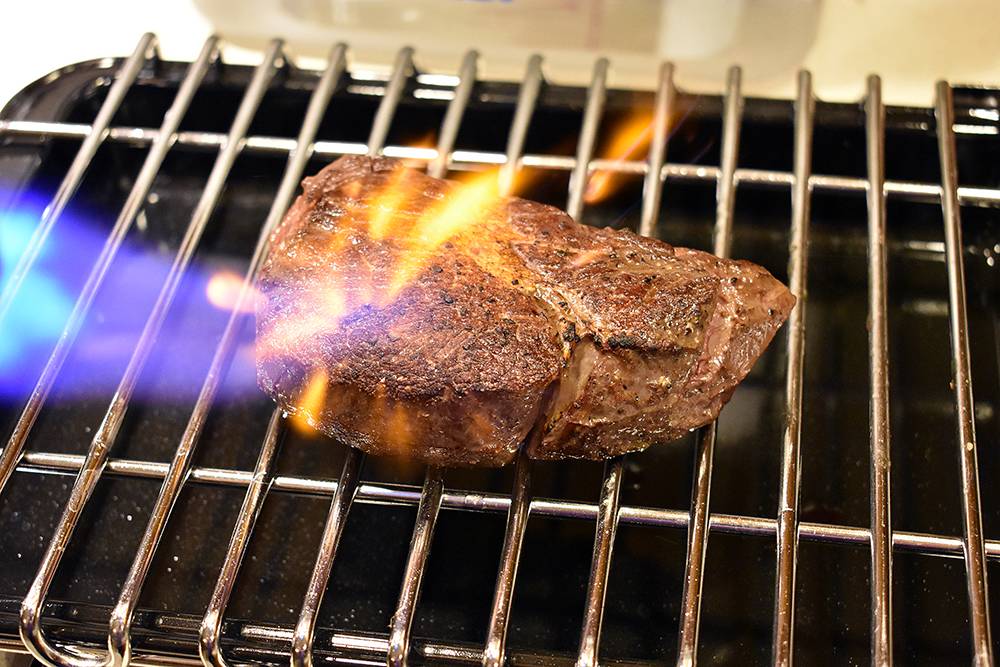
Step 4: Remove Steak and Torch
If you have the Sansaire kit, place the steak on the drip tray/grill grate and break out the torch. It doesn’t take long to finish the sear off, the last one I did took about 30 seconds of flame time total, but it depends on your tastes.
Step 5: Pour Pan Juices on Steak
If you have any juices in the pan, pour them over the steak since the torch’s heat can dry out the crust a bit. The added juices will also help re-crisp the crust while it’s still hot. Don’t have any juices in the pan? You can reheat the juices from your sous vide bag in a separate pan during the sear and use that.
And now it’s time to eat.
Can I use my cast iron pan on my outdoor grill to sear my steak? This would avoid the “smoke alarm” issue!!!
Then torch and add butter!
Thanks
Yes! My tip…put the cast iron skillet in your oven 1/2 hour before you plan to sear and turn the temperature to 450 or 500. It will be evenly heated through and ripping hot. Take it outside with oven mitts, add oil, and sear outside.
You absolutely can! Cast Iron works just as well on the grill as on the stove. Just make sure to wear some oven mitts when you go to grab the handle. The entire thing’s going to be ripping hot!
See above
I have a large propane grill with a dedicated searing burner. It is a large, rectangular ceramic burner that gets hotter than, well, you know. Anyway, after the first time I tried out using my Lodge 9″ ridged cast iron skillet and it took two hours to clear the smoke from the house, my wife kinda insists that I do all searing outside on the grill. The searing burner does work pretty well, though. Have you ever tested one of these out?
What thickness of steak do you recommend for this? Is there a sliding scale between thickness and sear time that you have figured out yet?
For something like a pork tenderloin, how long would the max time between the finished cooking via Sous Vide and searing?
Have you tried the sear with an infrared burner? If so would you use it in combination with the cast iron? Infrared 1st and then in the skillet with butter or the other way around?